This guide will show you how to use your CRM’s email templates and dynamic links to automatically insert recipient data correctly. We’ll use HubSpot CRM as an example, but the steps are similar for most CRMs. You can also apply this method to your regular email communications.
Select Video language:
TRAINING LINKS AND MATERIALS
- HubSpot: How to create templates
- PipeDrive: How to create templates
- SalesForce: How to create templates
Using CRM templates saves time and ensures consistent, personalized communication. Templates allow you to quickly send tailored emails at different sales stages, enhancing customer experience and boosting engagement. They also minimize manual errors, making your emails more accurate and effective.
Summary
Here’s how to share a link from the Trainers Hub:
- Copy the link from the Trainers Hub page you wish to share, as you normally would.
- You can enhance the link by adding pre-filled values, making it easier for the customer to register on the Training Hub.
- Additionally, you can include a campaign code in the link to track and analyze which campaigns generate the best leads.
The link format should look like this:
https://uni.example.com?email=FIRSTNAME.LASTNAME@EXAMPLE.COM&src=CAMPAIGN&organisation=COMPANY
You will need to replace the placeholders with the appropriate information:
- FIRSTNAME.LASTNAME@EXAMPLE.COM = Receiver’s email address
- CAMPAIGN = Your campaign code (used for performance analysis)
- COMPANY = Receiver’s company name
Example links:
https://uni.visualizer.fi/en/?email=Mike.Boat@uniwaves.com&src=fi_2024-08-14&organisation=Uniwaves Oy
https://uni.uniwaves.com/en/?email=john.smith@gmail.com&src=holiday2024&organisation=Hill Hotel
Notice: Special characters as ‘ or ” may be a problem in the organisation name. therefore we recommend to leave the organisation as the last one in the link.
Please refer to the detailed step-by-step instructions below.
Step 1: Open Your CRM and Create a New Template
- Access Email Templates:
- Navigate to the email templates section in your CRM.
- Create a new template.
- Create Templates for Your Sales Process:
- It’s recommended to have a template for each step in your sales funnel. This approach makes your workflow easier and faster.
Step 2: Fill in the Template
- Template Details:
- Give your template a name.
- Write the email subject.
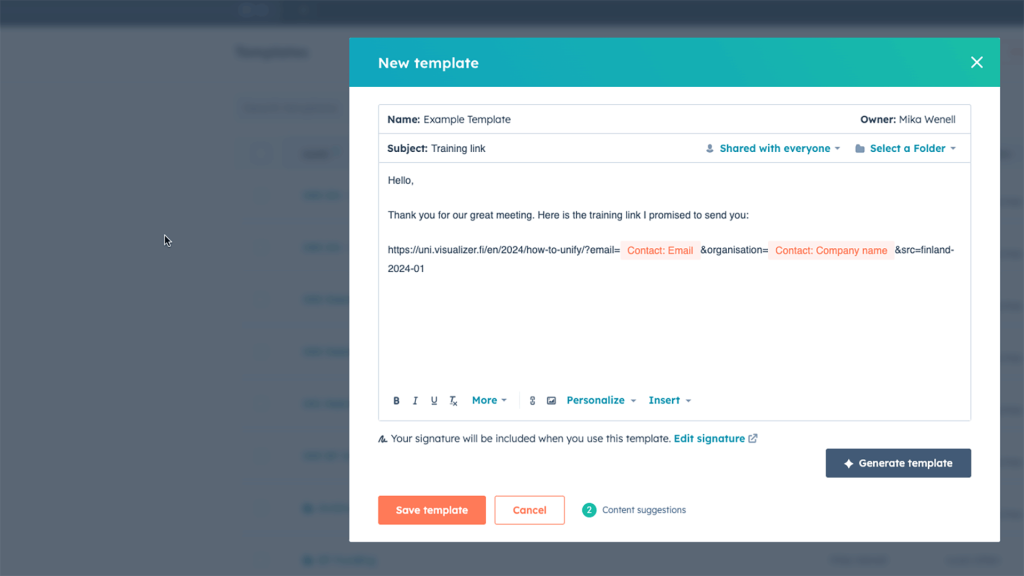
- Craft your message. Below is a short example for reference.
- Include Training Hub Links:
- Copy and paste the link from the Training Hub page you want your customers or prospects to visit. This could be a link to specific training content or the Training Hub’s front page.
Step 3: Prefill the Link with Customer Information (Optional)
- Prefill Customer Email:
- To make registration easier for your customer, you can prefill their email address in the link.
- Add
?email=to the end of the link. - In HubSpot, click “Personalize” at the bottom, find the email token, and click it. This will insert the customer’s email into the link.
- Prefill Organization Name:
- To add the organization name, add
&organisation=to the end of the link. - Open the “Personalize” popup again, find the company token, and click it to add the organization name to the link.
- To add the organization name, add
- Track Campaigns:
- To track which campaigns generate leads, add
&src=followed by the campaign’s short name to the end of the link.
- To track which campaigns generate leads, add
Your link should look something like below:
https://uni.example.com?email={{email}}&organisation={{company}}&src=campaign_code
where the {{}} formatting may vary across different CRMs. Note that the campaign_code can also be sourced directly from the CRM if there is a designated field for it.

Screenshot from HubSpot CRM: Template with a link. Orange tags are replaced with contact email and company name.
Step 4: Save the Template
- After adding all necessary details, save your template.
Step 5: Sending Emails
Remember, prefilled email and organization fields are optional.
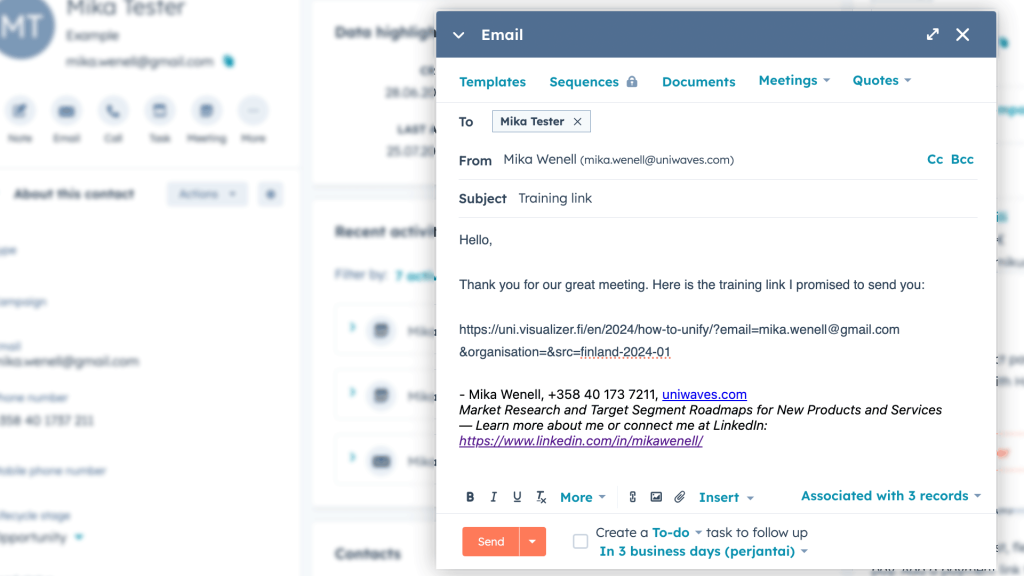
Now, you can go to any contact and send an email using this template.
You can also use this method in marketing newsletters and personal email clients. While it’s a bit more manual, the basic idea is to copy the link and use it.

Screenshot from HubSpot: Email sending. Link has automatically correct email and company name of the contact.
